How to Make Listing Photos Look Professional Without Misleading Guests
Hosts need polished property photos that still show the real space accurately. Here is how to improve presentation without creating false expectations.
Hosts have a real tension to manage: photos need to look good enough to compete, but not so polished that guests feel misled when they arrive.
That tension appears often in short-term rental discussions. Hosts want brighter rooms, cleaner galleries, and photos that feel more professional than a quick phone snapshot. Guests, meanwhile, complain when photos feel too stylized, hide useful context, or make the property look different from the stay they actually booked.
Both concerns are valid. Strong listing photos should help people understand the real property more clearly. They should not invent a better property.
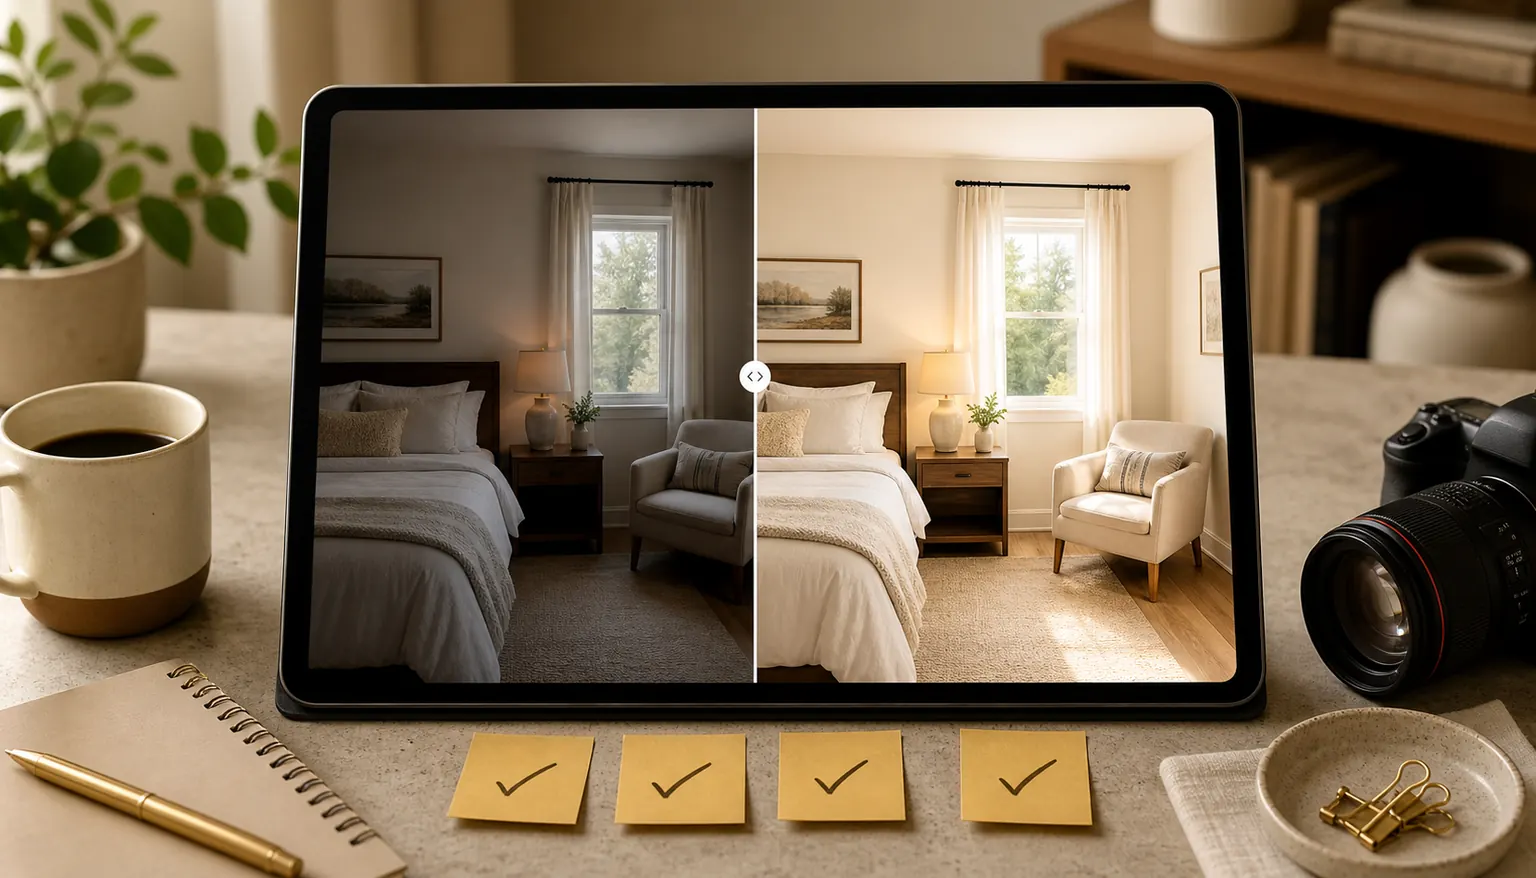
PerfProperty is designed around that line: improve the presentation of the actual space, compare the result with the original, request targeted fixes when needed, and approve only the versions that still feel accurate.
Professional does not have to mean fake
A photo can look more professional without changing what the property is.
Useful improvements usually make the image easier to read:
- a dark bedroom looks closer to how it feels in normal daylight;
- a kitchen with mixed warm and cool lighting looks more balanced;
- a living room photo has straighter walls and clearer detail;
- a patio image shows the seating area without dull, gray color;
- a bathroom photo looks clean and bright without changing fixtures or finishes.
Those changes support guest understanding. They are different from edits that misrepresent the space.
A misleading edit would add a hot tub that is not there, make a small room look materially larger, replace worn flooring with a different finish, hide water damage, or change the view outside a window. Those changes may make a photo look stronger at first glance, but they create the wrong expectation.
The better request is not "make this perfect." It is "make the real space look clear, bright, and fair."
Use the original as the anchor
PerfProperty keeps the original photo central to the workflow because the original is the reference point.
After enhancement, compare the result against what you uploaded and what you know about the property. Look for brighter exposure without blown-out windows, cleaner color without changing materials, sharper detail without strange textures, and straighter lines without stretching the room.
The before-and-after review should answer one question: does this still look like the same property a guest will walk into?
If the answer is yes, the image may be ready to approve. If the answer is close but not quite, use a targeted edit rather than accepting the first version.
Use targeted edits for photo problems, not property realities
Most listing-photo fixes are practical and local. One dark corner. One loose cord. One color cast from a lamp. One glare spot on a countertop. One crooked doorway.
PerfProperty lets you click the part of the image that needs attention and describe the change in plain language.
Good targeted edit requests sound like:
- "Brighten this corner but keep the room natural."
- "Reduce the yellow color from this lamp."
- "Remove this loose charging cable on the floor."
- "Make the window less blown out if there is detail available."
- "Straighten the vertical lines around this doorway."
- "Tone down the glare on this countertop."
These are specific, visible, and tied to presentation. They make the photo more useful without asking the system to reinterpret the property.
Avoid requests that change what a guest should reasonably expect:
- "Add a fire pit."
- "Make this room look bigger."
- "Hide the crack in the tile."
- "Replace the old sofa with a new one."
- "Make the view look like open water."
- "Remove the neighboring building from the window."
If the detail affects the stay, the condition of the property, the available amenities, the view, or the layout, it should not be edited away as if it does not exist.
Know the difference between clutter and material detail
Some edits are reasonable because they remove temporary distractions. A remote on the coffee table, a loose cord, a trash bin accidentally left in frame, or a camera glare spot can pull attention away from the room without telling guests anything meaningful about the property.
Other details matter because they affect expectations. A damaged wall, missing railing, stained ceiling, blocked view, steep stair, dated fixture, or worn surface may be part of the real decision a guest is making.
A useful rule: if removing something would make a guest feel surprised or disappointed on arrival, do not remove it. If removing it simply makes the photo less cluttered while preserving the same room, amenity, layout, condition, and view, it may be a reasonable targeted edit.
Approval is what makes a photo listing-ready
PerfProperty does not treat enhancement as an automatic final answer. Generated results can be useful, but they still need human review.
That review step matters because you know the property. You can tell whether the floor color still looks right, whether the window view stayed accurate, whether a bathroom finish changed too much, or whether an edit accidentally removed something important.
Before approving a photo, check:
- Are the room size and layout still accurate?
- Are the furnishings, fixtures, and finishes true to the property?
- Are real amenities shown clearly, without adding anything new?
- Are defects or limitations represented honestly?
- Does the image look polished without feeling artificial?
- Would a guest recognize the space from the photo when they arrive?
Only approved versions should move into the final gallery. That keeps the host in control instead of treating automation as the final judge.
What PerfProperty is designed to improve
PerfProperty is best used for common photo issues that make a real property look worse than it is.
| Photo issue | Helpful enhancement goal | Honesty check |
|---|---|---|
| Dark room | Brighten visible detail | Do not make the room look sunlit if it is not |
| Mixed lighting | Balance color temperature | Keep wall, floor, and furniture colors believable |
| Crooked lines | Straighten the composition | Do not stretch the room or change proportions |
| Dull exterior | Improve clarity and color | Do not change landscaping, boundaries, or views |
| Temporary clutter | Remove small distractions | Do not hide damage, missing items, or permanent limitations |
| Glare or reflections | Reduce visual noise | Do not erase important fixtures or visible conditions |
The best edits make the photo more useful. They help a guest understand the space faster and with more confidence.
A practical workflow for honest polish
If you are refreshing a gallery, work through the photos in this order:
- Upload photos that already show the real property clearly.
- Enhance the set to improve brightness, color, clarity, and consistency.
- Compare each result with the original.
- Use targeted edits for specific issues that still need attention.
- Reject or revise anything that changes the property too much.
- Approve only the versions that feel polished and accurate.
- Download the approved images for your listing workflow.
This keeps the process simple without giving up control. You are not trying to become a photo editor. You are making a practical judgment: does this image present the real space at its best?
Professional-looking photos can help a listing feel more complete, more cared for, and easier to evaluate. But trust is part of photo quality. A guest should not have to wonder whether the room was stretched, the view was improved, or a problem was hidden.
PerfProperty helps with that balance by combining enhancement, before-and-after comparison, targeted edits, and host approval. The result is a workflow for better listing photos without turning the property into something it is not.
You can try one property photo without signing up and review the before-and-after result yourself.